Welcome!!

Welcome to the 50's Housewife blog. You are guaranteed to find mouth watering, from scratch, recipe tutorials, activities for you and your family, giveaways, cleaning tips, and so much more. This blog is dedicated to improving the quality of families in this day and age. I plan to learn just as much from you as you hopefully do from me. Have a great day and happy reading!
Showing posts with label Tutorial. Show all posts

Friday, March 23, 2012

Amish White Bread - Tutorial

This bread is some of the most amazing bread I have ever eaten!!  My boys, friends, and family all agree.  Actually, my family and some friends around the corner from me have regular standing "orders" for this bread.  The family around the corner will actually cut off chunks of the bread to hide from each other, hoping that they end up with the larger majority of it!  To me, that's a pretty big testimony of it's greatness.  I have now taken to making them each their own loaf :-) . 

Your ingredients: Bread Flour, Sugar, Yeast, Salt, and Vegetable Oil.  Pretty simple so far!

For this first part, you will take 2/3 cup sugar and dissolve it in 2 cups WARM water. Add in 1 1/2 TBSP yeast after the sugar is dissolved. Let it set until the yeast creates a micro foam. See how the yeast is starting to foam? Not done yet.


Ah! The yeast is all foamy and ready for the other ingredients.

To the foamy mixture, add 1 1/2 tsp. salt and 1/4 cup oil. Mix with a spoon and then attach your bowl to your mixer 'cause it's time to get doughy.  If you're mixing this by hand, stretch your arms out first.  You will get all the upper body workout that you will need for the day.

Add in 3 cups of bread flour and mix. You will be using your dough hook with the mixer set on 2. Don't forget to lock your stand in the down position or it will start bucking like a bronco later. Sadly, yes, I speak from experience LOL. After the first 3 cups are mixed in, add one cup of flour at a time for a total of 6 cups of flour in your dough. If you are mixing by hand, skip the next few steps and just add one cup of flour at a time (6 cups total).

This is what will happen during cup 5 of adding flour to the dough lol.

This is what mine looked like after my 6th cup was mixed in. Still very sticky and clingy, which is not what you want. The cause?? Remember that last pic of the flour on the counter after cup 5? I needed to replace that flour in the dough. So, I added a 1/2 cup of flour and it was perfect!

See how it's no longer sticky and clinging to the dough hook? That extra 1/2 cup to replace what flew out on cup 5 was just what I needed. Time for it to rise!

Your well oiled bowl for letting the dough rise in (different from the bowl you mix the dough in).

Place the dough in the well oiled bowl. Turn the dough in order to coat the ball in the oil (lightly coated).

Take a CLEAN dish towel, wet it down, ring it out and place it over the top of your dough bowl. Let this rise for one hour.  I'm trying to get the bread to absorb a bit of Faith, Hope, and Love with my towel ;-)

This is what your dough will look like after it has risen for an hour. Yay!! Almost done. Just a few more steps. This is the point where my father in law likes to come in and make mention of the house smelling like a brewery. One of his favorite scents lol. He's a good ole' Irish man that used to brew his own beer.

You know all of that frustration you've been building up about...well, whatever it is? Time to take it out on the dough. Go boxing champ on that risen dough and beat it down with your fists!!

Now, knead it with your knuckles (kinda like giving it a lift and tuck massage) for about one minute.


Split the dough into two equally sized balls.

Shape each ball into a loaf. Best way to do this is to go back to your Pre-School days and roll it like a snake the way you would with your PlayDough. Take it between your hands and roll it back and forth, letting the weight of the dough pull it down and stretch it out. Place those loafs into two, well oiled loaf pans. Set your oven to pre-heat to 350 F while your let the dough do it's 2nd rise.  **NOTE:  Make sure you set yours smoother than my loaf on the right, it was having issues lol.

Let the dough rise in the loaf pans for 30 minutes. When that time is up, put it in the oven and bake for 30 minutes.

Final product!! Mmmmm mmmm mmmm  Makes you want to stuff your face with carbs huh?  Don't worry, what I can't see, I can't speak about.

Thursday, March 22, 2012

Whipped Butter - Tutorial

Making whipped butter is extremely easy, but it does take some time and patience.  Read through the pictures and you'll be amazed at how simple it is to have your own homemade whipped butter.  It will change your life forever!  I use it in all of my cooking.  Mashed potatoes made with this butter are the best I have ever tasted.  No joke.

Let's get started! Dump one quart COLD Heavy Whipping Cream into your bowl.

Start out SLOW! If you try to move through the settings too quickly, you will throw cream all over your kitchen lol. I started out on 2.  BTW, I totally do not speak from experience about throwing cream all over my kitchen. *blink blink*  Not buying it??  Yeah, me either LOL.

As it got a little more substance to it, I moved up to 4. See how it's still throwing cream up the sides of the bowl? Just move one setting at a time to make sure you avoid a mess.

Starting to get some thickness to it, so I worked my way up to 6.

Now, we're just about to whipped cream, so I moved it up to 8 which just so happens to be the factory recommendation for whipping cream.  In case you were wondering.  While I'm doing all of this waiting, I tend to make up silly songs in my head.  You should try it sometime.  It's really entertaining!!

Ahhhh, if we were making whipped cream, this is where we would stop, add a little vanilla, maybe some sugar, or leave it plain. But, we're not doing that today, so let's keep going. Once you have stiff peaks forming, lower your setting back down to 4.

Just let it keep going at the 4 setting.

Getting even thicker now! Keep a very close eye on the change that is about to take place in the thickness and texture of the whipping cream.
What a beautiful site!! See how it's starting to go from whipped cream to almost a cottage cheese type texture? That's what we're looking for!!

Let it beat just a little bit longer. You want this to happen when you lift the mixer out of the bowl. Gorgeous, stuck together, clinging to the mixer, WHIPPED BUTTER! Knock off the butter into the bowl. Add a dash of salt, if you want it salted (use your own judgement for measurement). Now, you can add food coloring to this if you like, but I tend to leave mine just a pretty, fluffy white.

Just put it in your bowl for the fridge and voila! You're done. Mixing up one full quart will make 2 of these Cool Whip bowls of butter. Use one and freeze the other, or be a good person and pass on a bowl of homemade whipped butter to someone else. I promise, they'll love you for it!!

Dulce De Leche - Tutorial

This is so easy to make, it should almost be made against the law!!  Welcome to the shortest tutorial ever.

Take a can of sweetened condensed milk. Remove the label. DO NOT OPEN THE CAN.

Bring a large pot of water to boil. Place the can (or 2 or 3) in the pot. Be sure that the water covers the can ENTIRELY. If the water level gets down below the top of the can, you could have an explosion on your hands. Boil at a medium stove setting for 3 hours. 

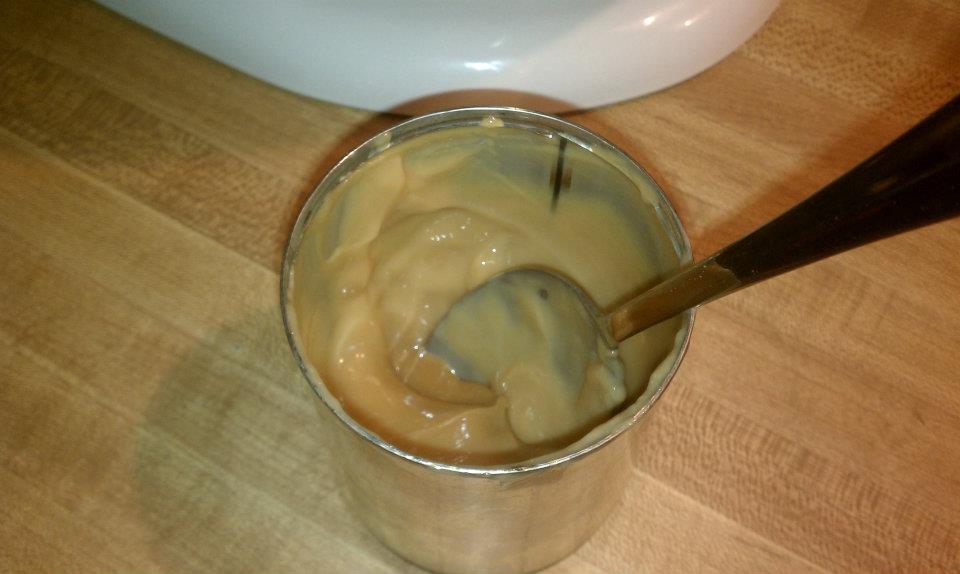
Take the can(s) out of the water and let cool on a metal rack. When it's cooled down (to the touch), open the can and enjoy your delicious dulce de leche (caramel sauce).

See!!!  I told you that it was way too easy.  If you get fat off of eating cans of this each day, you cannot blame me!  Just sayin'.

Caramel Swirl Fried Apple Ice Cream - Tutorial

"No machine needed."
"What did you say?"
"No machine needed!"
"Impossible!"
"I'm telling ya."
"I have got to see this to believe it."

I have had many conversations like that about this ice cream.  Yes, it's true.  NO MACHINE NEEDED!  I'll show you how so you believe it.  Skeptics, sheesh!

This ice cream can be flavored any way that you want it to be really.  I'll post the ingredients for my Mint White Chocolate Chunk at the bottom.  First off, we'll start off with the ice cream itself.  All you need, is a pint of Heavy Whipping Cream, one can sweetened condensed milk, and about a Tbsp of melted butter.  That's it! 

Start off by putting your well chilled Heavy Whipping Cream into a cold mixing bowl.

Mix and mix and mix until you have a thick whipped cream that forms stiff peaks.

 I saved these two steps for last on this Fried Apple ice cream, because I didn't want the whipped cream to deflate while it waited.  So, I highly recommend that you leave this part for later.  But, that whipped cream is the basis of your ice cream, no matter the flavor.  You will always mix one can sweetened condensed milk and some melted butter with your ingredients before incorporating the whipped cream.  But, you'll see how that's done as you scroll through.  With those few ingredients and that whipped cream, your ice cream possibilities are endless!!

Okay, now for the remainder of the ice cream, 'cause I can see that you're getting bored and hungry.

Start with 3 medium to small apples

Using your dual corer/slicer, slice them up and throw away that core.  Be sure to check that you got all of the core, 'cause nobody wants core to ruin their ice cream.  That would be disastrous.

Now, take those slices that you got from your slicer and chop it all up into small bits.

Those small little bits should like like this.  Before you put them in your skillet, add a couple Tbsp of butter and melt it down.

Cover and cook on Medium heat for 15 minutes. Stir frequently. You'll find the apples to be nice and mushy soft when they're done.


While the apples are cooking, you will want to make that whipped cream.

When your apples are done cooking, turn off the heat. Mix in 1/2 tsp. cinnamon and a dash of nutmeg. Then in a very large bowl (that can go in your freezer) mix together one can sweetened condensed milk, 1 Tbsp. melted butter, and your apples.  I wanted to make a crumb topping (like on pies) to mix in, but I was out of flour :(  I bet it would be really yummy with a crumble topping though.


GENTLY fold the whipped cream into your apple mixture. You really need to be careful here because you do not want to deflate the whipped cream. So be patient!!

Now, take several spoon fulls of that dulce de leche we made in another tutorial (as much or as little as you like) and drop it on top of the ice cream mixture. GENTLY fold that in as well. You want to leave it as swirls in the mixture and not completely mixed in.  You will not want to use the dulce de leche cold for this, it should be slightly warmed to make for good swirling fun.
Then, put your lid on your bowl and pop it in the freezer! Wait for it to freeze (I know, it's killer having to wait!!) and then enjoy a bowl of delight that will make your taste-buds do a little dance on your tongue :-)


Mint White Chocolate Chunk:
To the sweetened condensed milk step, add 1 tsp Mint extract, and as much shaved white chocolate as you want.  Proceed with the folding process and freeze.  I imagine that you could use white chocolate chips instead of shaving your chocolate, but it just seems so much tastier when you do as much of a recipe by hand as possible.  Am I right??

TX Roadhouse Cinnamon Butter - Tutorial

Oh my goodness!!  I can't believe that I found this recipe.  It has sent me straight to heaven and back again.  Seriously.  Texas Roadhouse has the BEST cinnamon butter around.  I've wanted to go eat there at times just so I could have their butter.  Don't laugh!!  You know you've done it too.  Now, I can have it at home, made with my own butter, which gives it an edge in my opinion, and I don't have to spend the money on eating out in order to get my fix.  Perfection!!

Let's get started, so that you can get your fix before you cause a flood in your house from your drooling.  In your mixing bowl, add 1/2 cup softened butter (1 stick), 1 tsp. cinnamon, and 1/3 cup confectioners sugar. Using your beater attachment on your mixer (or whatever you have), beat it all together.

This is the consistency I got from using my homemade whipped butter.
This is the consistency that I got when I used a softened stick of store bought butter.

The homemade whipped butter makes for a much smoother and almost saucy cinnamon butter. Very spreadable! The store bought stick makes for a much thicker and clumpier butter. Whichever way you prefer, 'cause they're both delicious!!  

I took some of both to my neighbors, along with their fresh loaf of bread, and the butter was devoured in zero seconds flat.  They turned from humans into vacuums the moment I walked in their door.  It was an odd experience.  But, both the Amish White Bread and this butter are so yummy, I forgave them.  They have since returned to their human forms and the friendship is going strong as ever.

Meatloaf, Green Beans, and Tortillas...non-typical Tutorial

This meal was inspired by an empty fridge, no time to make bread, and a need to always have a full, balanced meal for my family to eat haha.  It turned out to be a pretty big hit with the boys!  So, I figured I would pass it along to ya'll, just in case you have a night where you're desperate for something yummy and different. Notice, I didn't say, "A night where you have an empty fridge too," 'cause I'm sure none of you ever have that problem....right???

We'll start with the meatloaf.  This isn't your typical meatloaf, oh no ma'am.  This is cheese stuffed, bbq sauce topped, delicious goodness meatloaf!!  This recipe was inspired by The Virtuous Wife.  Amanda uses turkey in hers, so if you prefer to do that, you are more than welcome to, and it will still be truly delicious.

What you need for the meatloaf:
2.5 lbs 80/20 ground beef
Seasonings of your choice
1 egg, slightly beaten
Bread crumbs, oatmeal, or cracker crumbs (your preference)
Shredded Cheese
BBQ sauce

Mix all of the ingredients EXCEPT the cheese and bbq sauce, in a large bowl. Use your hands and get messy honey! I promsie, the kids will love being chased around by ooey gooey handed Mom. Mine do anyways, but I don't touch them of course. Put half of the meat into your loaf pan. Pat it down in there. Spread your shredded cheese on top of the meat in the loaf pan.  I had one of my boys put the cheese in for me.  They get to feel like they helped, which they love doing, and it kept my ooey gooey hands dedicated to the meat. Take the other half of the meat and place it on top of the cheese. Pat it all down to fill out the pan. Bake at 350 degrees F for 1 hour. Take it out, pour your bbq sauce on top, and bake for 15 more minutes. Done!


It's making me hungry just looking at it!

After you put the bbq sauce on the meatloaf, it will be time to start your green beans.  I was desperate for something different when it came to the veggie, so I decided to make a slight twist on our favorite holiday green bean casserole.  Use one family sized can of green beans, 1/3 can, family sized, cream of mushroom soup, Tony Chachere's Creole seasoning (don't use too much), and Garlic powder, about 1 Tbsp.  Mix it all together in a saucepan and heat it up. Serve nice and piping hot.

Tastes much better than it looks, I promise.


While you let your green beans simmer and are waiting for your meatloaf to finish up (your house should be smelling AMAZING at this point), go ahead and put together your tortillas.  These are really simple and pretty yummy.  They also make a really great snack for the afternoons when your kiddos get home from school, and they can make it themselves.  How about that?  Heat each tortilla in the microwave for about 10 seconds, or on your stove top for a couple seconds on each side.  You don't want them hot, or they'll melt the butter, but you do want them pliable (easy to roll).   On each tortilla, spread the sweet, delicious, addicting, Texas Roadhouse Style Butter (click link for tutorial).  Then, just roll the tortilla up, butter to the inside, nice and tight.

Best butter EVER, spread all over the tortilla.  YUMMMM!!!

Rolled nice and tight.


Voila!  You now have a full meal, that was actually really easy, and your family will be extremely grateful.  You will probably have rose petals laid at your feet as you walk through the house, along with all the accolades they will give you.  Even better, maybe, just maybe, your husband will be so impressed, that he will offer to do the dishes!  Okay, so I can't really make those kinds of promises to you, but your family will be well fed and most likely, enjoy every bite of their food.  That in itself is a wonderful gift.

Don't you just love the fine china I chose for this meal hehe